
You often see ‘The file is too large for the destination file system’ error message when trying to copy a file larger than 4GB to a USB flash drive in Windows 10 or earlier versions.
E.g. if you try to copy a 5GB video file to an empty 16GB USB flash drive, the error message appears – even though there is plenty of free space available on the USB drive.
[In older versions of Windows like XP you’d see a different error message stating ‘There is not enough free disk space’ which was even more unhelpful because it said there was not enough space on USB drive when this was not the cause]
Flash Drive Says Not Enough Space But There Is
The cause of both error messages is nothing to do with the amount of free storage space on the USB drive – in the example below I had 28GB free space so a 10GB file would easily fit…

The error occurs because USB flash drives come pre-formatted in the FAT32 file system which has a maximum single file size limit of 4GB i.e. you can’t copy a file larger than 4GB into a FAT32 formatted drive, no matter how much free space is available.
So the error message is correct in saying that the file (4GB or more) is too large for the destination (USB drive) file system (FAT32). But it’s annoying that Microsoft won’t change the error message to clarify and tell you how to fix it!
What Are FAT32 and NTFS?
FAT (File Allocation Table) is a type of file system and FAT32 is the latest version. It was commonly used on hard drives in Windows computers before XP, which introduced a newer file system called NTFS – still used today by Windows 10.
Let’s briefly compare the two file systems:
FAT32
Supported by almost all modern operating systems – so it is a good file system for sharing data between different computers like PC and Mac or other devices like cameras and TVs.
Single file size limit – 4GB so FAT32 is best suited to relatively small storage devices like USB flash drives and memory cards for phones/cameras.
NTFS
Improved performance, reliability and disk space use – so it is a great file system for larger capacity hard drives in modern Windows 10 computers.
Single file size limit – 16TB (c 16,000GB!) in W7, 256TB and higher in Windows 8/10. Realistically, that means it has no single file size limit – you’re never going to encounter a 16,000 GB file ;-)
How To Fix ‘The File Is Too Large For The Destination File System’ Error
To be able to copy a file larger than 4GB, you’ll need to convert the USB drive from FAT32 to the NTFS file system.
Because NTFS realistically has no single file size limit, files of any size can then be copied to the USB drive.
[NTFS is the file system used by your PC hard drive – that is why you don’t see this error message when copying/saving files larger than 4GB within your PC]
How To Convert USB Flash Drive to NTFS File System
1. Plug in your USB flash drive. For safety, take a backup of all files on it (e.g. copy them to your computer) before proceeding to the next step.
2. OPTIONAL – this step enables write caching on the USB flash drive which optimizes it for quicker performance and is more suited to NTFS. You don’t have to do this step – if you aren’t too bothered about speed of data transfers skip to step 3:
- W7 or earlier – press Start then right click ‘Computer’ and select ‘Manage’ to open the Computer Management window.
- W8/10 – right click on the Start button then click on Computer Management to open the Computer Management window.
- In the left panel, choose Device Manager (under System Tools).
- In the right panel, double click ‘Disk drives’ to expand the list of devices – your USB drive should be listed there:

- Right click your USB flash drive and choose ‘Properties’ to open its Properties window then select the Policies tab.
- Choose the ‘Better Performance’ (or ‘Optimize for performance’ in old versions of Windows) option then press OK and close Computer Management:

Now you can change the file system on the drive to NTFS in the next step.
3. Convert The Drive To NTFS – there are two alternative ways to do this – the first tries to keep all data on the USB drive (no guarantees) but the second will delete all data on the USB drive. Whichever method you choose, if you didn’t take a backup earlier, do it now to avoid data loss.
Method 1 – Conversion
- Click ‘Start’ and type CMD into the search box. Right click on the ‘CMD’ program in the search results and select ‘Run as administrator’.
- You may now see a User Account Control message asking “Do you want to allow the following program to make changes to this computer?”. Click on ‘Yes’ to confirm.
- This will open an elevated (Administrator) level Command Prompt window
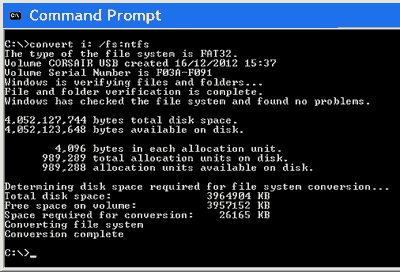
- In the command prompt window, type
convert x: /fs:ntfsthen press Enter where x: is the drive letter of your flash drive.
E.g. in the example below, my USB flash drive is letter i: so, to convert it to NTFS, I typed convert i: /fs:ntfs
- The process indicates when conversion is complete:
Note: if there was not enough free space on the Flash drive, the conversion will fail – either delete some data from it and try again or skip to the next method which deletes all data on the drive.
- Close the Command Prompt window. The drive is now using NTFS so you can transfer files larger than 4GB to it.
Method 2 – Format
This alternative method formats the USB drive which will definitely delete all data on it:
- Go to File Explorer (Computer)
- Right click your USB flash drive and select ‘Format…’

- This opens the Format window as shown below. Change the ‘File system’ from FAT32 to NTFS.
- Tick ‘Quick Format’ to save time if you wish as the process can take a long time on a large capacity flash drive. However, if you leave it un-ticked then the format process will also be able to scan for any damage to the drive:

- Press ‘Start’ to begin formatting the drive to NTFS and press OK to accept the warning message that ‘Formatting will erase ALL data on this disk’
- After the process completes, a confirmation message appears
- Press OK then Close the Format window. The flash drive is now using NTFS so you can transfer files larger than 4GB to it
4. Check the USB drive now uses NTFS – if you want to double check that the drive does now use NTFS, open File Explorer (Computer), right click on your flash drive and select ‘Properties’ – the General tab should display ‘File system: NTFS’ as shown below:

Conclusion
32GB+ flash drives are now common but they still come pre-formatted to the FAT32 file system for best compatibility with a wide range of computers and devices.
As we may now need to copy ever larger files (e.g. videos) to flash drives, this error is becoming increasingly common. However, the limitation of the 4GB file size is easy to resolve by converting the flash drive’s file system to NTFS.
Finally, if you have recently bought a new USB flash drive (especially from an auction site…) it is always worth testing it for errors or fake size – unscrupulous sellers offer cheap flash drives that are faulty or, for example, are sold as 32GB but are really only 4GB…


It worked!! Thank you!
Thanks so much! This was so easy to follow and it solved my problem! Interesting information.
Solved… Great
Thank you , this was exactly what was wrong, I’m just moving the files over in sections instead of a group, perfect!!.
What about when you have a 16GB flash drive (NTFS formatted) with about 9GB free and you are trying to transfer a 4GB file and Windows 10 tells you there is not sufficient space? I have this problem all the time since upgrading to Windows 10 and sometimes it’s with smaller files and the entire flash drive is free. This happens on multiple flash drives.
Has anyone else had this problem and found a workaround? I haven’t seen any responses from Microsoft about this issue.
Clear, complete, successful. Thank you!
Thanks!!!! No one else could tell me HOW to change to NTFS. Fantastic!
u r 2 good .. thank u ; thank u very much
This was a HUGE help. I couldn’t figure out what was going on. Now I can transfer a 5G file over! Thank you!
If you definitely mean total space (i.e. total capacity, not just free space) then the drive may be faulty or a fake size – see https://techlogon.com/test-a-usb-flash-drive-for-errors-or-fake-size/ to test it.
But i got a problem….my flash drive of 8 gb space shows only 100mb total space what is the problem????